How to fix Windows error (Complete Guide)
If
you are trying to start a program from a desktop shortcut and to your
surprise nothing happens or Windows is asking you with what program
would you like to use to open the .lnk file.
If this is happening then you have a Windows Registry error,which is
caused by a failed Windows update,a faulty driver or in some cases a
computer virus.
How to fix .LNK extension error (Virus Removal Guide)
This page is a comprehensive guide which will
remove restore the .LNK file association settings and remove all malware
from Windows.
Please perform all the steps in the correct order. If you have any questions or doubt at any point, STOP and ask for our assistance.
Please perform all the steps in the correct order. If you have any questions or doubt at any point, STOP and ask for our assistance.
-
To remove the browser redirect, follow these steps:
- STEP 1: Restore .LNK file association settings in Windows registry
- STEP 2: Scan your computer with Malwarebytes Anti-Malware
- STEP 3: Scan your computer with HitmanPro
- (OPTIONAL) STEP 4: Scan your computer with Zemana AntiMalware
STEP 1: Restore .LNK file association settings in Windows registry
The main reason of this error is because your
machine does not recognize the .exe extension because of an error in
your Windows Registry, to fix this issue, you can use any of the below
steps to fix it.
OPTION 1: Use Rkill to restore your file association
- You can download Rkill from the below link.
RKILL DOWNLOAD LINK (his link will open a new web page from where you can download “RKill”) - Double click on Rkill program to stop the malicious programs from running.

- RKill will now start working in the background, please be patient
while this utiltiy looks for malicious process and tries to end them.

- When the Rkill tool has completed its task, it will generate a log.
Do not reboot your computer after running RKill as the malware programs
will start again.

OPTION 2: Use the “Repair .lnk (Shortcuts) File Association” tool
- You can download the Repair .lnk (Shortcuts) File Association tool from the below link
REPAIR .LNK FILE ASSOCIATION DOWNLOAD LINK (This link will open a new web page from where you can download Repair .lnk (Shortcuts) File Association) - Double click on the previously downloaded file, then click on the Start button.
![[Image: Repair LNK]](https://malwaretips.com/blogs/wp-content/uploads/2012/10/reapir-lnk.jpg "Repair LNK")
OPTION 3: Use System Restore to restore your system to an earlier state
- Open System Restore by clicking the Start button .
- In the search box, type System Restore, and then, in the list of results, click System Restore.
- Follow the steps in the wizard to choose a restore point and restore your computer to an earlier state.
OPTION 4: Manually remove the unwanted registry change
- Click Start Menu, and then type regedit in the Start Search and press ENTER.
- Browse to the following registry branch:
HKEY_CURRENT_USER\Software\Microsoft\Windows\CurrentVersion\Explorer\FileExts\.lnk - Click on the arrow to expand it and delete the sub-key named UserChoice.
- Exit from Registry Editor and reboot your machine.
STEP 2: Scan your computer with Malwarebytes Anti-Malware
Malwarebytes Anti-Malware is a powerful on-demand scanner which
should remove all types of malware from your machine. It is important to
note that Malwarebytes Anti-Malware will run alongside antivirus
software without conflicts.
- You can download download Malwarebytes Anti-Malware from the below link.
MALWAREBYTES ANTI-MALWARE DOWNLOAD LINK (This link will open a new web page from where you can download “Malwarebytes Anti-Malware”) - Once downloaded, close all programs, then double-click on the icon on your desktop named “mbam-setup” to start the installation of Malwarebytes Anti-Malware.

You may be presented with a User Account Control dialog asking you if you want to run this file. If this happens, you should click “Yes” to continue with the installation.

- When the installation begins, you will see the Malwarebytes Anti-Malware Setup Wizard which will guide you through the installation process.

To install Malwarebytes Anti-Malware on your machine, keep following the prompts by clicking the “Next” button.

- Once installed, Malwarebytes Anti-Malware will automatically start
and will update the antivirus database. To start a system scan you can
click on the “Scan Now” button.

- Malwarebytes Anti-Malware will now start scanning your computer for
malware. When Malwarebytes Anti-Malware is scanning it will look like
the image below.

- When the scan has completed, you will be presented with a screen
showing the malware infections that Malwarebytes Anti-Malware has
detected. To remove the malicious programs that Malwarebytes
Anti-malware has found, click on the “Remove Selected” button.

- Malwarebytes Anti-Malware will now quarantine all the malicious
files and registry keys that it has found. When removing the files, Malwarebytes Anti-Malware may require a reboot
in order to remove some of them. If it displays a message stating that
it needs to reboot your computer, please allow it to do so.

After your computer will restart, you should open Malwarebytes Anti-Malware and perform another scan to verify that there are no remaining threats
STEP 3: Scan your computer with HitmanPro
HitmanPro can find and remove malware, adware, bots, and other
threats that even the best antivirus suite can oftentimes miss.
HitmanPro is designed to run alongside your antivirus suite, firewall,
and other security tools.
- You can download HitmanPro from the below link:
HITMANPRO DOWNLOAD LINK (This link will open a new web page from where you can download “HitmanPro”) - Double-click on the file named “HitmanPro.exe” (for 32-bit versions of Windows) or “HitmanPro_x64.exe” (for 64-bit versions of Windows).

Click on the “Next” button, to install HitmanPro on your computer.

- HitmanPro will now begin to scan your computer for malware.
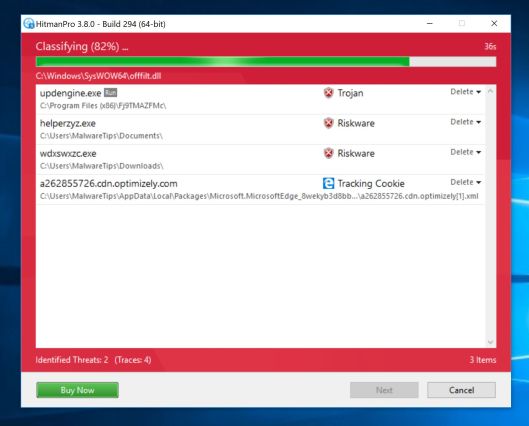
- When it has finished it will display a list of all the malware that
the program found as shown in the image below. Click on the “Next” button, to remove malware.

- Click on the “Activate free license” button to begin the free 30 days trial, and remove all the malicious files from your computer.

(OPTIONAL) STEP 4: Scan your computer with Zemana AntiMalware
Zemana AntiMalware is a powerful utility which will remove malicious browser extensions and other malware from Windows.
This step should be performed only if your issues have not been solved by the previous steps.
This step should be performed only if your issues have not been solved by the previous steps.
- You can download Zemana AntiMalware from the below link:
ZEMANA ANTIMALWARE DOWNLOAD LINK (This link will start the download of “Zemana AntiMalware”) - Double-click on the file named “Zemana.AntiMalware.Setup.exe” to start the installation of Zemana AntiMalware.

You may be presented with a User Account Control dialog asking you if you want to run this file. If this happens, you should click “Yes” to continue with the installation.

- Click on the “Next” button, to install Zemana AntiMalware on your computer.

- When Zemana AntiMalware will start, click on the “Scan” button.

- Zemana AntiMalware will now scan computer for malicious files. This process can take up to 10 minutes.

- When Zemana AntiMalware has finished it will display a list of all the malware that the program found. Click on the “Next” button, to remove the malicious files from your computer.

Zemana AntiMalware will now remove all the detected malicious files, and at the end a system reboot may be required to remove all traces of malware.
Your computer should now be free of malware.
If you are still experiencing problems while trying to remove any browser redirect from your machine, please start a new thread in our Malware Removal Assistance forum.
If you are still experiencing problems while trying to remove any browser redirect from your machine, please start a new thread in our Malware Removal Assistance forum.
We love Malwarebytes and HitmanPro!
We really like the free versions of Malwarebytes and HitmanPro, and we love the Malwarebytes Anti-Malware Premium and HitmanPro.Alert features.
 Malwarebytes
Anti-Malware Premium sits beside your traditional antivirus, filling in
any gaps in its defenses, providing extra protection against sneakier
security threats.
Malwarebytes
Anti-Malware Premium sits beside your traditional antivirus, filling in
any gaps in its defenses, providing extra protection against sneakier
security threats.
 HitmanPro.Alert
prevents good programs from being exploited, stops ransomware from
running, and detects a host of different intruders by analyzing their
behavior. HitmanPro.Alert will run alongside your current antivirus
without any issues.
HitmanPro.Alert
prevents good programs from being exploited, stops ransomware from
running, and detects a host of different intruders by analyzing their
behavior. HitmanPro.Alert will run alongside your current antivirus
without any issues.
i love this blog
ReplyDeleteThanks for dropping by
Delete